
It’s crazy to say in the era of [NOT PROVIDED], but Google is giving me really useful keyword data lately.
This post outlines how I’ve used keyword data from Google Search Console to drastically increase organic search traffic (specifically to pages that already receive some search traffic).
In addition to increasing my client’s traffic, this method has also helped me understand my client’s customers, and their most pressing questions and needs, and adjust content accordingly.
I’ve detailed my process as a case study. The example I use here is the most successful of a handful of “wins” I’ve seen using this method over the past three months. The example is the clearing your criminal record page on Houston defense attorney Fred Dahr’s website.
The Results
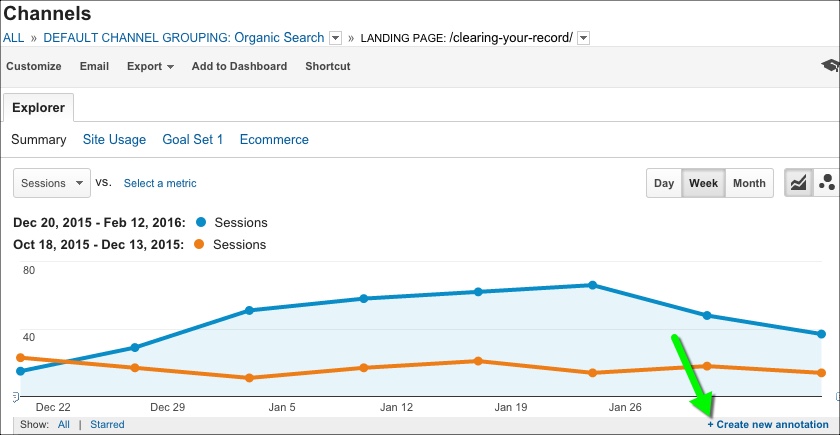
Before I ask you to read the whole post, I’ll show you the results:
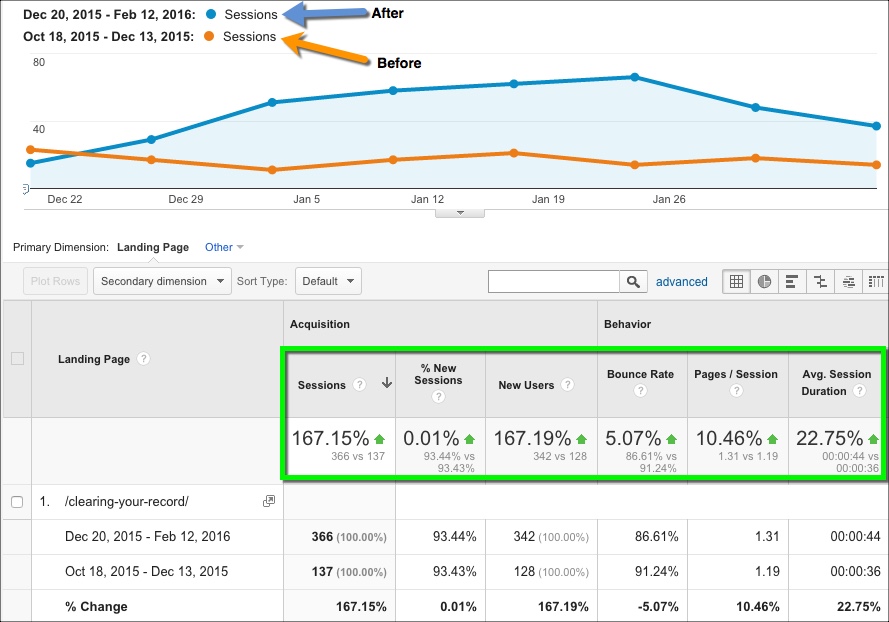
Nice, right? Here’s how I did it:
Step 1: Select a Page to Optimize
Identify a page that’s getting some organic search traffic. I would say at least 50 organic search visits per month is a good starting point.
It should also be a page that you care about; one that could generate positive outcomes (leads, referrals, links, social shares, etc.)
Step 2: To Google Search Console!
Next, launch Google Search Console and navigate to your website’s dashboard. Then, click through to Search Traffic // Search Analytics:
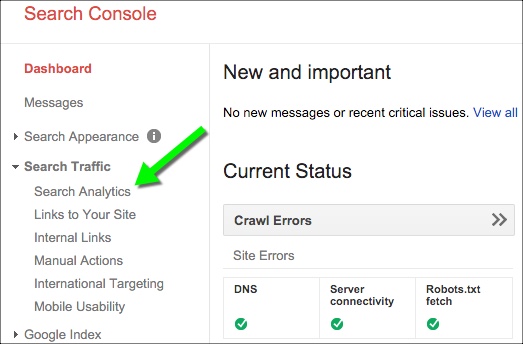
Next, click “Pages” and select your landing page:
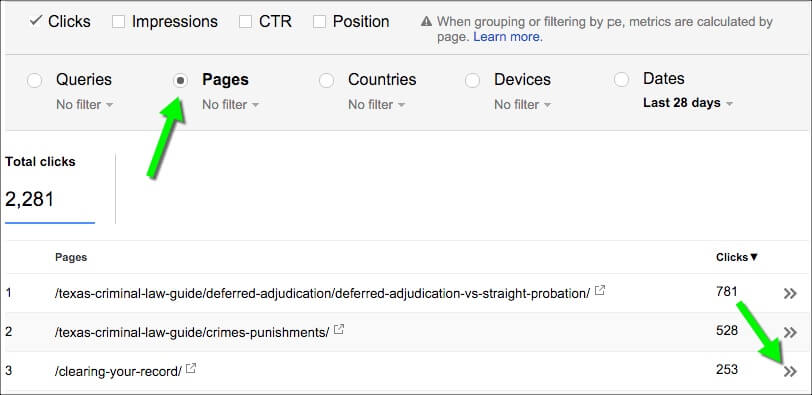
Once you’ve filtered by landing page, select “Queries”:
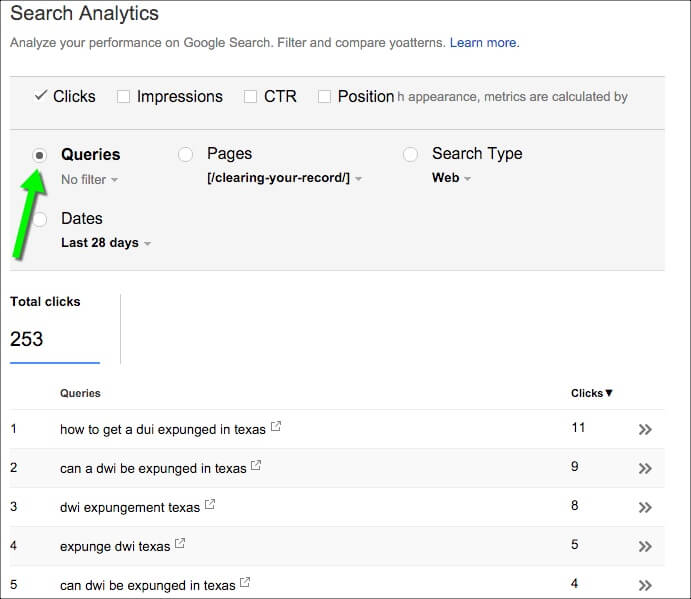
Once you’re here, looking at a list of beautiful search queries that have sent traffic to your landing page, click the radio buttons for “Impressions” and “Position”. This data will prove helpful.
Step 3: Evaluate the Keyword Data
The “Clearing Your Record” page contains information on eligibility for clearing one’s criminal record in Texas with expunction and non-disclosure.
Initially, I assumed that people would search general queries, such as:
- get your record cleared texas
- clearing criminal record texas
- record expunction in texas
- expunge record in texas
But, what Google’s keyword data showed me was that the overwhelming majority of clicks and impressions came from queries specifically related to DWI expunction:
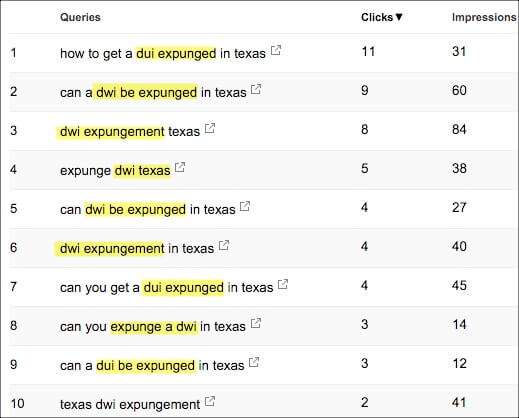
This information is invaluable because it allows me to re-optimize the page, not only for higher volume keywords, but also for user intent.
Step 4: Re-Optimize the Page for the New Target Keywords
I started by re-optimizing what is perhaps the most impactful on-page optimization element, the title tag.
Previous Title Tag:
![]()
Re-Optimized Title Tag:
![]()
Next, I turned my attention to the Heading 1 (H1) tag. The previous H1 tag was: Clearing Your Record.
Because I didn’t want to turn away anyone looking for general record clearing information, I decided not to use the DWI expunction keywords in the H1.
Instead, I added “in Texas” to the H1, since the keyword data indicated that most people add that modifier:

Other Ways to Re-optimize for Your New Target Keyword
In this case, updating the title and H1 did the trick for me. However, there are plenty of other optimization changes you can make to improve performance for your new target keyword. For example:
- Add internal links pointed at the landing page and use the new keywords as anchor text
- Add variations of the new keyword to the body text and headings (be careful with this; no keyword stuffing!)
- Add the new keywords to the meta description (this can improve click through rate)
Step 5: Re-Optimize for User Intent
After optimizing for my new keywords, I optimized the page according to the lesson the keyword data taught me: That people who land on this page want to know specifically whether they are eligible for DWI expunction.
I noticed that the eligibility information was near the bottom of the page, and not particularly well formatted:

So, I moved it up, and adjusted it the formatting to address people’s most prevalent question:

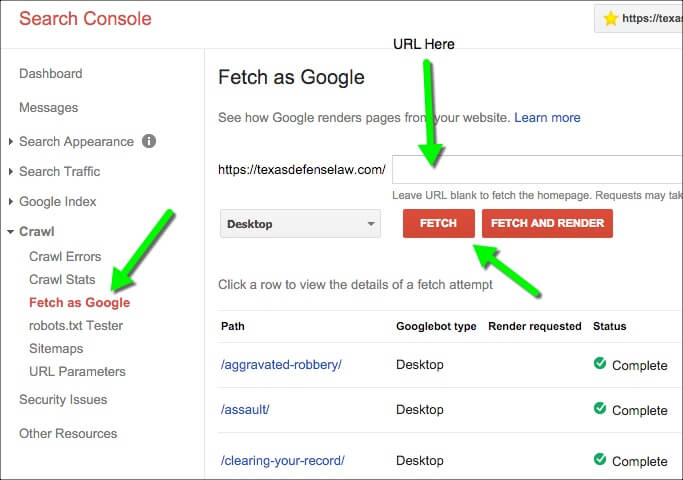
Step 6: Fetch as Google, Submit to Index, and Annotate in Analytics
The final step of my process is to submit the newly optimized page to Google’s index using the Fetch as Google tool, and also to annotate the changes in Google Analytics so that you can measure the results.

Wrapping up
By using the keyword data that Google provides in Google Search Console, you can re-optimize your site’s top content, which not only results in higher rankings and more traffic, but also happier users.
Maybe, just maybe, Google will begin to understand that granting webmasters and web marketers access to accurate keyword data will actually improve their most valuable product.